こんにちは、mito(@mito_works)です。

いつもは2023年3月現在、推奨されているVue3でVite環境で開発していますが、バージョンを下げ、Vue2のclass-styleを使い、Vue-CLI環境で開発をしたのでVue3との違いも含めてまとめます。

Contents
開発環境
以下、使用したパッケージのバージョン情報です。
Vue-CLI 5.0.8
Vue.js 2.6.14
typescript 4.9.5
Node.js 16.13.2
npm 8.1.2
Vue-CLI公式ページ(https://cli.vuejs.org/)
@types/vueを入れるとよさそうなどいろいろ試しましたが、パッケージの開発が終了していたり…。色々勉強になりました!Vue-CLIでプロジェクトを作る
ターミナルで以下のコマンドを実行。
vue create sample-app
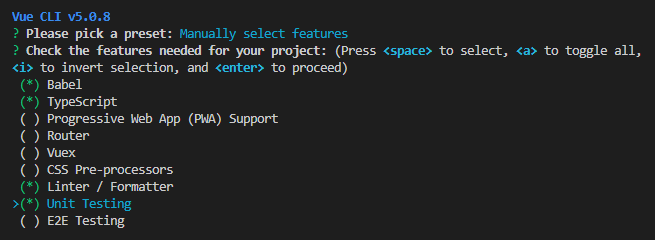
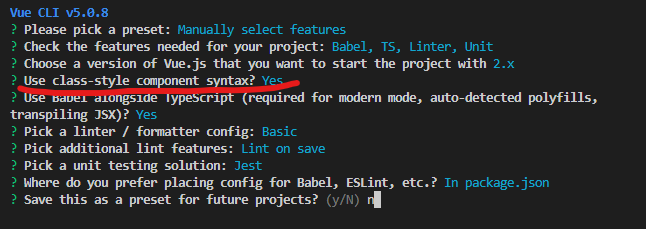
Presetを選んでいく
Manually select featuresを選び独自に設定していきます。
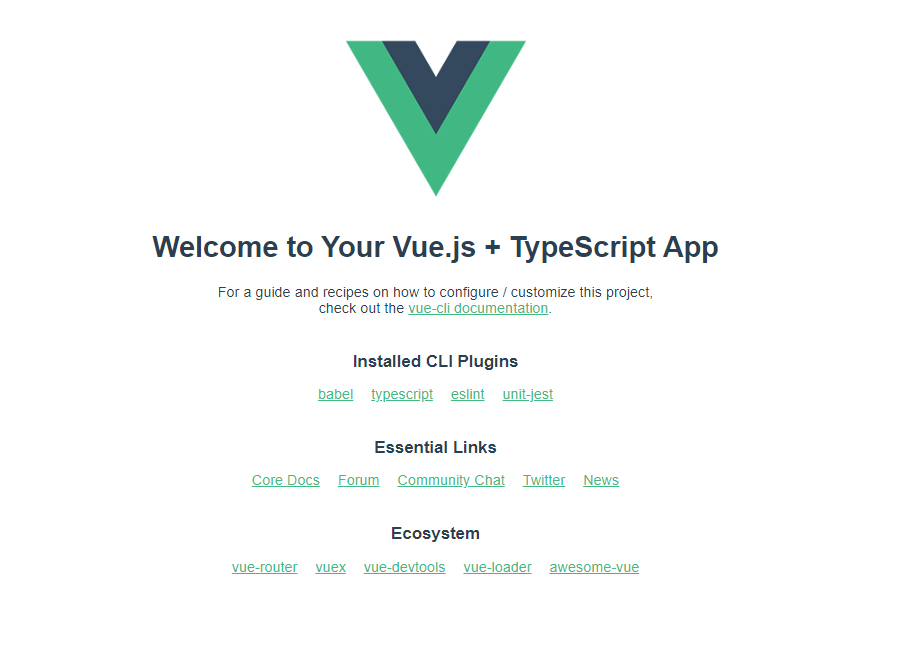
最後まで質問に答えるとインストールが始まります。
ローカルサーバーを立ち上げる
完了すると次の指示が表示されます。
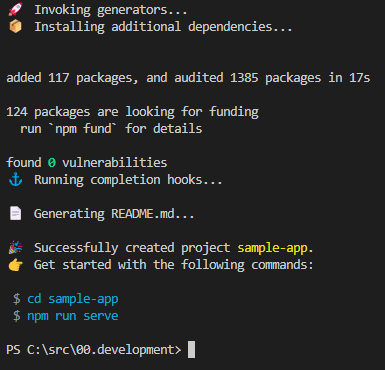
ターミナルの指示通り進みます。
cd sample-app
npm run serve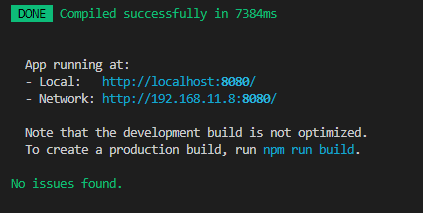
無事、サイトが立ち上がりました!
Vue3で書いた場合
プロジェクト作成に時間がかかるのでその間にVue3で書いたコードを紹介します。
仕様はこちら↓
<script setup lang="ts">
import { isTemplateNode } from "@vue/compiler-core";
import { ref, computed } from "vue";
const newsList = ref([
{
id: 0,
description: "新しい靴を買ったこと",
},
{
id: 1,
description: "好きなアニメの続編が公開された",
},
]);
const disabled = ref<boolean>(true);
const limitInputCheck = computed(() => {
if (inputDescriotion.value.length >= 30 || inputDescriotion.value.length <= 0) {
disabled.value = true;
} else {
disabled.value = false;
}
return inputDescriotion.value.length >= 20 ? "20文字以内でお願いします😮" : "";
});
const inputDescriotion = ref<string>("");
const input = () => {
const news = { id: Date.now(), description: inputDescriotion.value };
newsList.value.push(news);
inputDescriotion.value = "";
};
const deleteItem = (id: number) => {
newsList.value = newsList.value.filter((value) => {
return value.id != id;
});
};
</script>
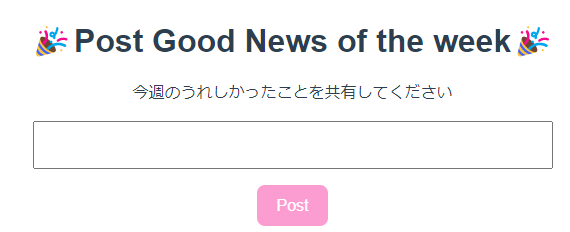
<template>
<div>
<h1>🎉Post Good News of the week🎉</h1>
<div class="l-container">
<div class="l-container__form">
<label for="post">今週のうれしかったこと、楽しかったことを共有してください</label>
<input type="text" id="post" v-model="inputDescriotion" />
<p v-if="limitInputCheck.length > 0" class="p-alert">{{ limitInputCheck }}</p>
<button type="button" class="p-btn-post" @click="input" :disabled="disabled">Post</button>
</div>
<div class="l-container__list">
<p v-if="newsList.length <= 0">投稿お待ちしています~😉</p>
<ul class="p-list">
<li v-for="item in newsList" :ley="item.id">
<p>{{ item.description }}</p>
<button type="button" class="p-btn-delete" @click="deleteItem(item.id)">Delete</button>
</li>
</ul>
</div>
</div>
</div>
</template>
<style scoped>
input[type="text"] {
padding: 0.5rem;
font-size: 1.5rem;
width: 500px;
}
.l-container__form {
display: flex;
flex-direction: column;
align-items: center;
gap: 1rem;
}
.p-btn-post {
background-color: #f70a8d;
color: #fff;
}
.p-btn-delete {
padding: 0 2rem;
background-color: rgb(128, 194, 233);
color: #fff;
}
.p-list {
list-style: none;
display: flex;
flex-direction: column;
align-items: center;
justify-content: space-between;
gap: 0.5rem;
}
.p-list li {
padding: 1rem 0.5rem;
background-color: rgb(203, 240, 252);
font-weight: bold;
width: 500px;
display: flex;
justify-content: space-between;
}
.p-alert {
color: #f70a8d;
font-weight: bold;
}
</style>vue-vite-goodnews/goodnews-step1/src/App.vue
Vue2のclass-styleで書いた場合
親子間のデータの受け渡しも実装してみたかったので、コンポーネントを分けました。
簡単なディレクトリは
APP.vue
components
|_Form.vue
|_List.vue
となっています。
vueファイルの中身
<template>
  <div id="app">
    <h1>🎉Post Good News of the week🎉</h1>
    <FormItem @input-item="inputParentsItem($event)" />
    <List :postList="postList" @delete-item="deletParentItem($event)" />
  </div>
</template>

<script lang="ts">
import { Component, Vue } from "vue-property-decorator";
import FormItem from "./components/Form.vue";
import List from "./components/List.vue";
import { Post } from "./newsItem";

@Component({
  components: {
    FormItem,
    List,
  },
})
export default class App extends Vue {
  postList = [
    {
      id: 0,
      description: "新し靴を買ったこと",
    },
    {
      id: 1,
      description: "早起きできた",
    },
  ];

  inputParentsItem($event: string): void {
    const post: Post = { id: Date.now(), description: $event };
    this.postList.push(post);
  }
  deletParentItem($event: number): void {
    this.postList = this.postList.filter((val) => {
      return val.id != $event;
    });
  }
}
</script>

<style>
#app {
  font-family: Avenir, Helvetica, Arial, sans-serif;

  text-align: center;
  color: #2c3e50;
  margin-top: 60px;
}
button {
  border: none;
  border-radius: 8px;
  padding: 0.7rem 1.2rem;
  font-size: 1rem;
  font-weight: 500;
}
</style>
vue-cli-goodnews-/blob/main/src/App.vue
<template>
  <div class="l-container__form">
    <label for="post">今週のうれしかったことを共有してください</label>
    <input type="text" id="post" v-model="inputDescription" />
    <p v-if="limitInputCheck" class="p-alert">{{ limitInputCheck }}</p>
    <button type="button" class="p-btn-post" @click="inputItem" :disabled="disabled">Post</button>
  </div>
</template>

<script lang="ts">
import { Vue, Component, Emit } from "vue-property-decorator";
@Component
export default class Form extends Vue {
  inputDescription = "";
  disabled = true;
  //emit
  @Emit("input-item")
  inputItem(): string {
    return this.inputDescription;
  }
  //computed
  get limitInputCheck(): string | null {
    if (this.inputDescription.length >= 20 || this.inputDescription.length <= 0) {
      this.disabled = true;
    } else {
      this.disabled = false;
    }
    return this.inputDescription.length >= 20 ? "20文字以内でお願いします😮" : "";
  }
}
</script>

<style scoped>
input[type="text"] {
  padding: 0.5rem;
  font-size: 1.5rem;
  width: 500px;
}
button:disabled {
  border: none;
  filter: opacity(0.4);
  cursor: not-allowed;
}
.l-container__form {
  display: flex;
  flex-direction: column;
  align-items: center;
  gap: 1rem;
}
.p-btn-post {
  background-color: #f70a8d;
  color: #fff;
}
.p-alert {
  color: #f70a8d;
  font-weight: bold;
}
</style>
vue-cli-goodnews-/blob/main/src/components/Form.vue
<template>
  <div class="l-container__list">
    <!-- <ul>
      <li v-for="post in postList" :key="post.id">{{ post.id }}</li>
    </ul> -->
    <p v-if="postList.length <= 0">投稿お待ちしています~😉</p>
    <ul class="p-list">
      <li v-for="post in postList" :key="post.id">
        <p>{{ post.description }}</p>
        <button type="button" class="p-btn-delete" @click="deleteItem(post.id, post.description)">Delete</button>
      </li>
    </ul>
  </div>
</template>

<script lang="ts">
import { Vue, Component, Emit, Prop } from "vue-property-decorator";
import { Post } from "../newsItem";
@Component
export default class List extends Vue {
  @Prop() postList!: Post[];
  @Emit("delete-item")
  deleteItem(id: number, description: string): number | null {
    if (confirm(`${description}を削除してよいですか?`)) {
      return id;
    }
    return null;
  }
}
</script>

<style scoped>
.p-btn-delete {
  padding: 0 2rem;
  background-color: rgb(128, 194, 233);
  color: #fff;
}
.p-list {
  list-style: none;
  display: flex;
  flex-direction: column;
  align-items: center;
  justify-content: space-between;
  gap: 0.5rem;
}
.p-list li {
  padding: 1rem 0.5rem;
  background-color: rgb(203, 240, 252);
  font-weight: bold;
  width: 500px;
  display: flex;
  justify-content: space-between;
}
</style>
vue-cli-goodnews-/blob/main/src/components/List.vue
型定義ファイルの中身
export type Item = { [key: string]: string | number };
export type Post = {
  id: number;
  description: string;
};
vue-cli-goodnews-/blob/main/src/newsItem.ts
Vue2のclass-styleで書いたコードのポイント
ポイントは、以下2つだと思います。
・class構文が使えるような書き方をしていること
・TypeScript特有のデコレーターの書き方でclassを拡張していること
もう少し詳しく書きます。
import { Component, Vue } from "vue-property-decorator";
とvue-property-decoratorからComponentとVueをインポートしています。vue-property-decoratorはTypeScript固有のclass構文を書くためのパッケージです。
個人的に違うと感じたポイント
・classはvueを拡張したclassとして書く。(export default class Form extends Vue{})
・@Component,@Emit,@Propなどデコレーターの書き方をしている
・computedはget 関数名で表現する
Netlifyでサイトを公開する(おまけ)
今回は静的サイトを簡単に公開できるnetlifyを使って公開してみました。
下準備(本番環境用にビルドする)
npm run build
を行い、作ったファイルを本番環境用にビルドします。

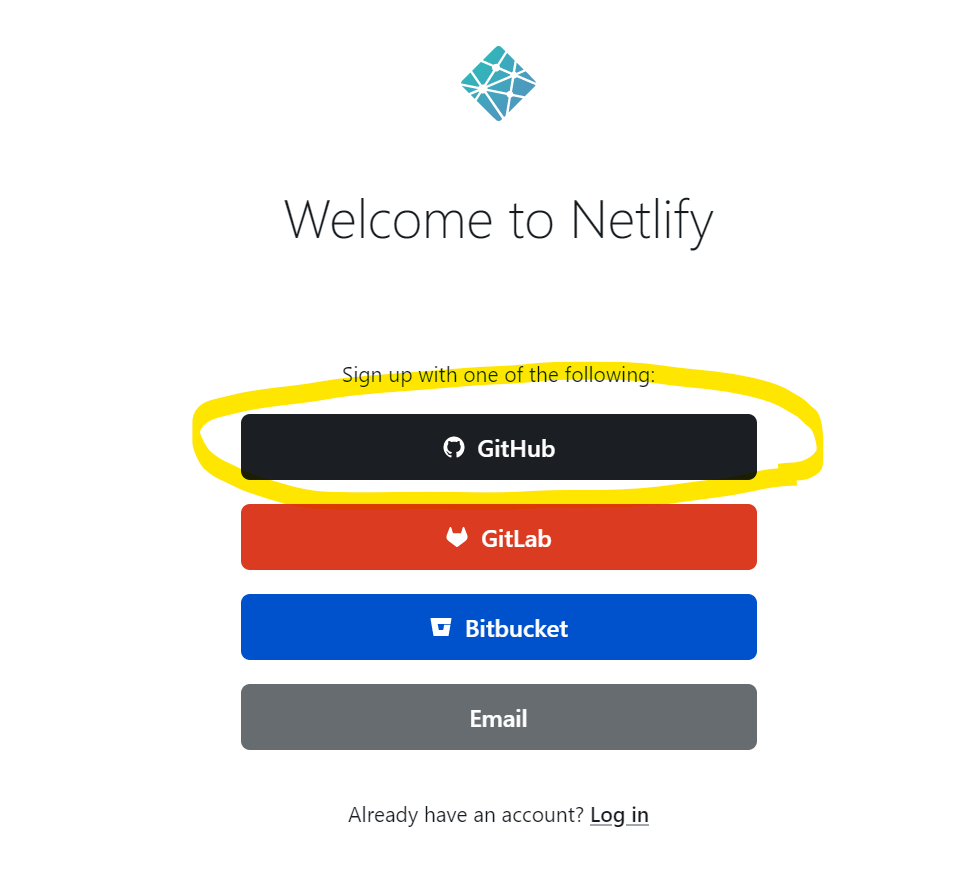
netlifyにsign upする
distフォルダ一式をアップロードする
Sitesタブに移動し、下準備で作成したdistファイルをドラッグ&ドロップでアップロードします。

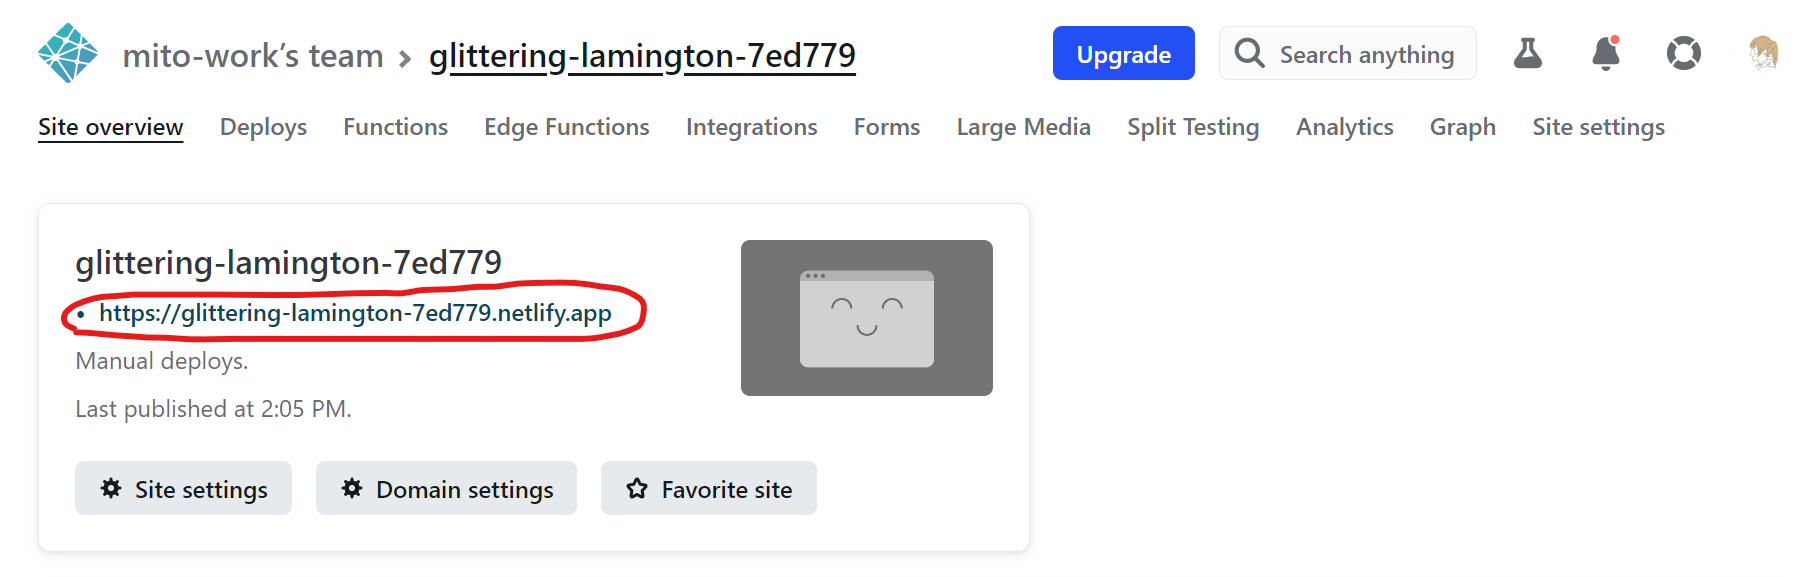
公開したサイトはこちら↓
Special Thanks
以下サイトとUdemy教材をとても参考にさせていただきました。